
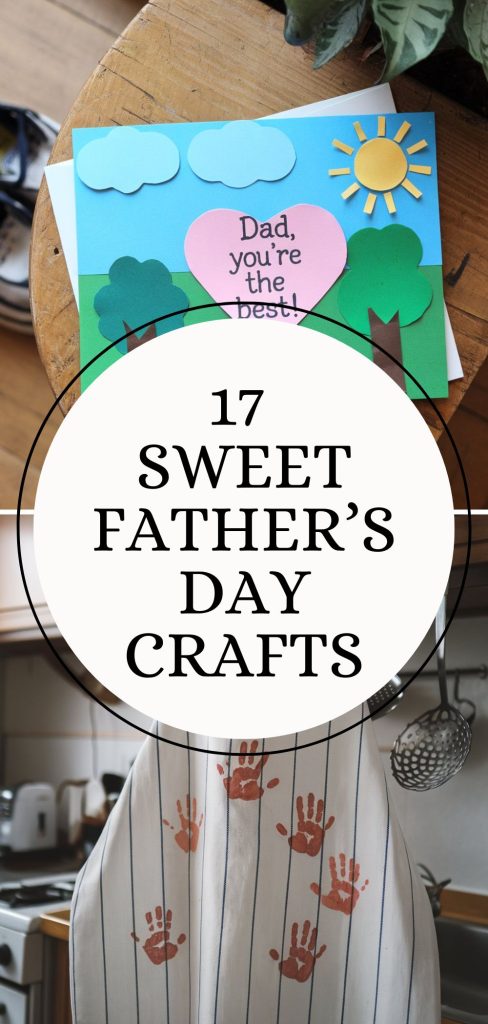
17 Easy & Meaningful Fathers Day Crafts
Father’s Day is a special opportunity for kids to show just how much they love and appreciate their dads, and one of the sweetest ways to do that is with a handmade gift straight from the heart.
Affiliate links may be used in this post and if so I will receive a commission at no extra cost. I’m also part of the Amazon Affiliate (Associate) program where I earn a commission from sales made through my affiliate links. Read the full disclosure policy.
These 17 Father’s Day craft ideas are simple enough for little hands, fun to create, and filled with love and meaning.
From meaningful keepsakes to playful DIY gifts, there’s a creative idea here for every age and skill level.
Let’s get crafting and make this Father’s Day one to remember!

More for Father’s Day:
- Father’s Day Gift Ideas: Meaningful Handmade & Purchased Gifts
- Father’s Day Questions for Kids to Fill Out for Their Dad
- 45+ Father’s Day Quotes to Celebrate the Amazing Dad in Your Life
“Dad Rocks” Paperweight
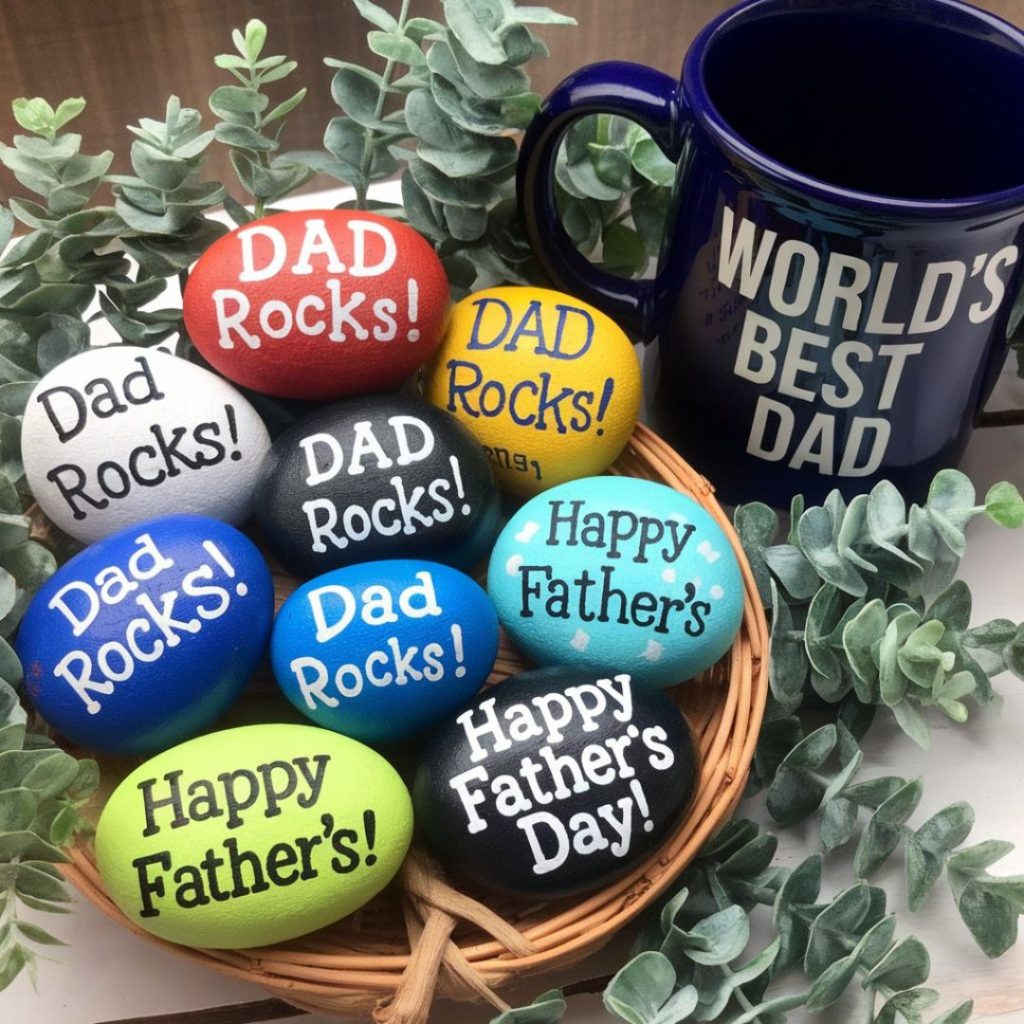
Let kids create a fun and heartfelt gift that Dad can proudly display on his desk, nightstand, or even out in the garden. This simple craft uses natural materials and a clever play on words to show just how much Dad means.
Supplies Needed:
- 1 large, smooth rock or flat stone (clean and dry)
- Small pebbles or decorative stones
- Acrylic paint (any colors)
- Paintbrush
- Craft glue or a hot glue gun (with adult supervision)
- Permanent marker or paint pen (black or white works best)
- Optional: clear sealant spray for outdoor display
How to Make It:
- Step 1: Choose a large rock with a fairly flat surface—clean and dry it before starting.
- Step 2: Paint the surface of the large rock in a solid color or a fun pattern. Let it dry completely.
- Step 3: Use a permanent marker or paint pen to write the words “Dad Rocks!” across the painted surface.
- Step 4: Let kids arrange and glue the small pebbles around the words or along the border of the rock. Press gently to secure.
- Step 5: (Optional) Spray the finished rock with a clear sealant to help preserve it, especially if it’ll go outside.
- Step 6: Let everything dry fully before wrapping it up as a Father’s Day surprise!
Tips:
You can personalize the rock even more by adding the child’s name and the year on the back. It’s a sweet little keepsake that Dad will treasure forever.
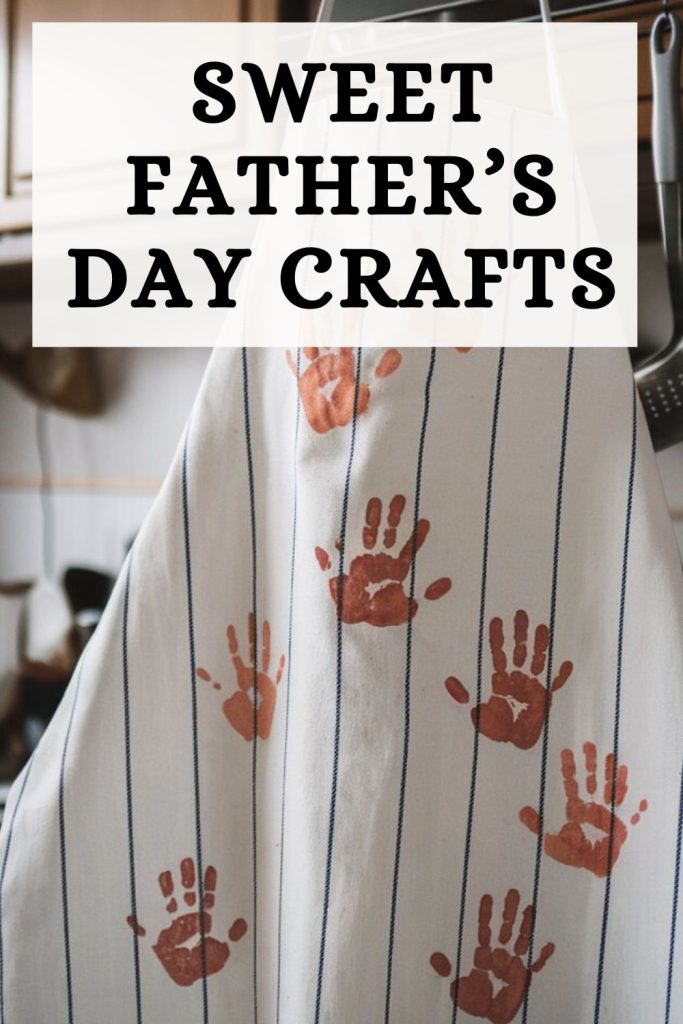
DIY Handprint Grilling Apron
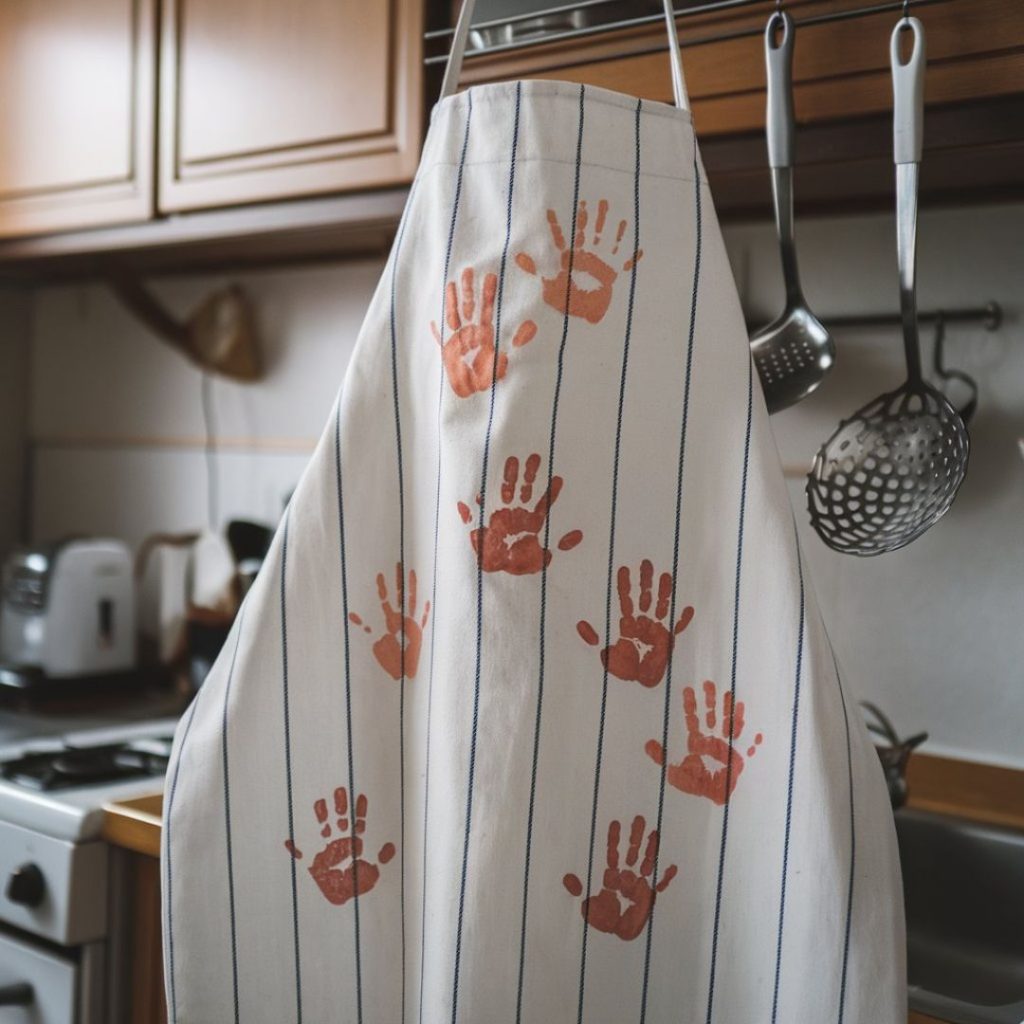
Celebrate Dad’s grill master status with a fun and personalized apron made with love! Kids can turn a plain apron into a colorful keepsake by stamping it with their handprints and adding a playful message. It’s both meaningful and practical—perfect for backyard BBQs.
Supplies Needed:
- Plain white cotton apron (child or adult size)
- Fabric paint (multiple colors)
- Paper plate or paint tray
- Foam brush or paintbrush
- Permanent fabric marker or paint pen (black or dark color)
- Old newspaper or cardboard (to place under the apron while painting)
- Optional: paint smock or old t-shirt for the kids
How to Make It:
- Step 1: Lay the apron flat on a protected surface with cardboard or newspaper underneath to prevent paint from seeping through.
- Step 2: Pour fabric paint onto a plate or tray. Let kids dip their hands in the paint or use a foam brush to coat their hands evenly.
- Step 3: Gently press the painted handprints onto the apron. Add multiple prints in different colors for a fun and vibrant look. Let each layer dry before adding more, if needed.
- Step 4: Once the paint is dry, use a permanent fabric marker or paint pen to write a message like “Best Dad by the Grill,” “King of the BBQ,” or “Grill Master Dad.”
- Step 5: (Optional) Add the child’s name and the date at the bottom for a sweet personal touch.
- Step 6: Let the apron dry completely according to the fabric paint’s instructions. Some fabric paints may require heat-setting with an iron for permanence—check the label.
TIP:
Candy Pair this handmade apron with a new set of grilling tools or a bottle of Dad’s favorite BBQ sauce to complete the gift!
Custom Coupon Book
Give Dad the gift that keeps on giving—a personalized coupon book filled with sweet offers and helpful gestures from the kids. From “one free hug” to “help with yard work,” these handmade coupons are fun to create and extra meaningful for Dad. Plus, it’s a great way for kids to think about acts of kindness!
Supplies Needed:
- Blank paper, construction paper, or cardstock
- Markers, crayons, or colored pencils
- Scissors
- Stapler or hole punch with ribbon/yarn
- Stickers, washi tape, or other decorations (optional)
- Ruler (optional, for neat cutting)
- Pen or pencil for writing coupon offers
How to Make It:
- Step 1: Cut several pieces of paper or cardstock into equal-sized rectangles (about 3″ x 6″ works well for mini coupons).
- Step 2: On each piece, write a thoughtful or fun offer for Dad. Some ideas include:
- One free hug
- Breakfast in bed
- Movie night of your choice
- Help with yard work
- Quiet time to nap
- Game night together
- Car washed by hand
- Step 3: Decorate each coupon with drawings, stickers, doodles, or colorful borders. Encourage kids to get creative!
- Step 4: Stack the coupons in the order you’d like, and staple one edge to create a booklet. You can also punch a hole in one corner and tie them together with ribbon or yarn.
- Step 5: Create a cover page that says “Dad’s Coupon Book” and decorate it too! You can include the child’s name and the year for an extra-personal touch.
Tip:
Encourage kids to think of specific things Dad loves or could use help with and make custom coupons just for him. It’s a sweet, thoughtful way to show love and appreciation.
Popsicle Stick Picture Frame
This homemade photo frame is a heartwarming gift that Dad will treasure. Using popsicle sticks and fun decorations, kids can create a one-of-a-kind frame to hold a special photo with Dad. It’s easy, creative, and makes a great keepsake for his desk or nightstand.
Supplies Needed:
- Popsicle sticks (8 for a square frame, more for larger sizes)
- Craft glue or hot glue (with adult supervision)
- Markers, paint, or crayons
- Buttons, sequins, stickers, glitter, or foam shapes for decorating
- 1 printed photo of Dad with the kids (sized to fit inside the frame)
- Cardstock or thin cardboard (for backing)
- Scissors
- Ribbon or string (optional, for hanging)
- Magnet strip (optional, if you want to make it a fridge magnet)
How to Make It:
- Step 1: Lay out 4 popsicle sticks in a square or rectangle shape. Glue the corners together and let dry. For a sturdier frame, you can add an extra layer of sticks on top or behind.
- Step 2: Once the frame is dry, decorate it using markers, paint, glitter, buttons, or whatever craft supplies you have on hand. Let kids personalize it however they like!
- Step 3: Trim the photo to fit behind the frame opening.
- Step 4: Glue the photo to a piece of cardstock or thin cardboard, then glue the popsicle stick frame on top.
- Step 5: Let everything dry completely.
- Step 6 (Optional): Add a loop of ribbon to the top for hanging or stick a magnet to the back so it can go on the fridge.
Tip:
Kids can write a short message or the year on the back of the frame for a memorable finishing touch. It’s a simple craft with big sentimental value!
Superhero Dad Card
Celebrate Dad’s superpowers—whether it’s making pancakes, fixing toys, or giving the best hugs—with this adorable handmade superhero card! Kids can turn their dad into a caped hero using paper and imagination, and write a heartfelt message inside that lets him know he’s their number one guy.
Supplies Needed:
- Construction paper or cardstock (various colors)
- Scissors
- Glue stick or craft glue
- Markers, crayons, or colored pencils
- Googly eyes (optional)
- Tape
- String or ribbon (optional for a cape)
- Pen or pencil for writing the message
How to Make It:
- Step 1: Fold a piece of cardstock in half to make the base of your card.
- Step 2: Cut out a superhero-style cape and mask from colored paper. You can also cut out boots, a lightning bolt emblem, or even a superhero belt!
- Step 3: On the front of the card, draw or glue a basic body shape to represent Dad. Add the cape, mask, and any other superhero accessories.
- Step 4: Use googly eyes or draw a face, then decorate the rest of the card with stars, action words like “WOW!” or “ZAP!” and fun designs.
- Step 5: Inside the card, write “You’re my hero!” and add a sweet note like, “Thank you for always saving the day. I love you, Dad!”
- Step 6 (Optional): Kids can sign their name and include the date to make it a keepsake Dad will always treasure.
Tip:
You can glue a photo of the child’s face onto the superhero body or draw Dad’s real features to make it extra special and personalized!
Dad’s Snack Jar
Make Dad’s day delicious with a custom snack jar filled with all his favorite treats! This fun and practical gift is easy for kids to put together and can be personalized with a handmade label and decorations. It’s perfect for a movie night, work desk, or keeping on hand during his favorite game.
Supplies Needed:
- Clean mason jar, plastic container, or empty food jar with lid
- Dad’s favorite snacks (nuts, trail mix, candy, jerky, etc.)
- Construction paper or cardstock (for the label)
- Markers, crayons, or pens
- Ribbon, twine, or washi tape (optional)
- Glue, tape, or glue dots
- Scissors
- Stickers or fun embellishments (optional)
How to Make It:
- Step 1: Thoroughly clean and dry your jar or container.
- Step 2: Fill the jar with Dad’s favorite snacks—think trail mix, peanuts, M&M’s, beef jerky bites, popcorn, or chocolate-covered treats.
- Step 3: Cut a label out of construction paper or cardstock and decorate it with messages like:
- “Dad’s Fuel”
- “Snack Attack – Just for Dad!”
- “Hands Off – Dad’s Stash!”
- Step 4: Tape or glue the label to the jar. You can also add smaller labels or tags around the lid or on the side with little notes from the kids.
- Step 5 (Optional): Wrap a ribbon or some twine around the top for an extra special touch. Let kids add stickers or draw designs right on the jar if it’s clear plastic.
- Step 6: Give it to Dad on Father’s Day and watch him enjoy every bite!
One last tip:
Let younger kids help by choosing snacks and placing them in the jar—great for hands-on fun and showing love through thoughtful choices.
“I Love You to Pieces” Puzzle Craft
This sweet and simple craft is a fun way for kids to show Dad just how much they love him—piece by piece! Using a heart shape and a handful of random puzzle pieces, this project turns into a colorful and creative keepsake that Dad will cherish forever.
Supplies Needed:
- Cardboard or thick cardstock
- Scissors
- Old puzzle pieces (the more colorful, the better!)
- Craft glue or glue stick
- Markers or paint pens
- Pencil (for tracing the heart)
- Optional: ribbon or magnet strip for displaying
How to Make It:
- Step 1: Cut a heart shape out of cardboard or sturdy cardstock. You can trace one first with a pencil to get the shape just right.
- Step 2: Have kids glue puzzle pieces all over the heart—randomly, in patterns, or even overlapping for extra texture. Let dry completely.
- Step 3: Once the glue has dried, write the message “I love you to pieces!” across the front using a marker or paint pen. You can also write it on a banner shape and glue it across the heart.
- Step 4 (Optional): Add a loop of ribbon to the back for hanging or attach a magnet strip to make it a fridge decoration.
- Step 5: Kids can sign the back with their name and the year for a personal touch.
One last tip:
If you don’t have extra puzzle pieces on hand, you can cut out odd-shaped pieces from construction paper or even let kids draw their own puzzle piece patterns directly onto the heart.
DIY Keychain with Beads
This DIY beaded keychain is a thoughtful, hands-on project kids will love making—and Dad will love using! With just a few supplies like alphabet beads and string, kids can create a one-of-a-kind keychain that spells out a sweet message or their name. It’s a fun keepsake he can carry with him every day!
Supplies Needed:
- Alphabet beads
- Pony beads or other decorative beads
- Stretchy string, elastic cord, or embroidery thread
- Key rings or split keychain rings
- Scissors
- Clear nail polish or glue (optional, to seal knots)
- Small pliers (optional, for securing key rings)
How to Make It:
- Step 1: Cut a piece of stretchy string or cord about 8–10 inches long (better to have extra and trim it later).
- Step 2: Tie one end of the string securely to the key ring. You can double-knot it or loop it through for a clean finish.
- Step 3: Let kids thread on alphabet beads to spell out words like:
- “DAD”
- “LOVE YOU”
- Their name or nickname
- “#1 DAD”
- Step 4: Add pony beads or other fun decorative beads on either side of the letter beads to give it color and personality.
- Step 5: Once the design is finished, tie the other end of the string securely with a strong double knot. Add a dab of clear nail polish or glue to the knot to help hold it in place.
- Step 6: Trim off any extra string, and your keychain is ready to gift!
One Last Tip:
For younger kids, use larger beads and thicker string for easier threading. Older kids might enjoy getting creative with patterns or colors that match Dad’s favorite sports team or hobby!
Father’s Day Interview
This adorable questionnaire is one of those classic Father’s Day gifts that never gets old. Kids get to share their sweet (and often hilarious!) thoughts about Dad in their own words. It’s simple to put together and makes a truly special keepsake for Dad to treasure for years to come.
Supplies Needed:
- Printed or handwritten “My Dad Is…” questionnaire
- Crayons, markers, or colored pencils
- A recent photo of the child (optional)
- Glue stick or tape
- Blank paper or cardstock
- Optional: stickers or stamps for decorating
How to Make It:
- Step 1: Print out a premade “My Dad Is…” questionnaire or write one on a sheet of paper. You can include fun prompts like:
- My dad is ____ years old.
- My dad’s favorite food is ____.
- He always says ____.
- I love it when my dad ____.
- My dad makes me laugh when he ____.
- My dad is the best because ____.
- Step 2: Let kids fill in the blanks with their honest and heartfelt answers—no editing needed! The funnier and sweeter, the better.
- Step 3: Add a drawing of Dad, a hand-drawn portrait, or a real photo of the child and Dad together.
- Step 4: Mount the finished questionnaire on a piece of colorful cardstock for a polished look. You can even frame it!
- Step 5 (Optional): Decorate with stickers, stamps, or doodles to personalize it even more.
One last tip:
This is a great keepsake to do every year! Watching how the answers change over time is just as special as the gift itself.
DIY Bottle Cap Magnets
These DIY bottle cap magnets are such a fun and unique gift idea! Kids can turn ordinary bottle caps into miniature photo frames that Dad can stick on the fridge, his toolbox, or filing cabinet at work. Each one is small, sweet, and packed with personality.
Supplies Needed:
- Clean bottle caps (metal or plastic work great)
- Small printed photos (faces should be about the size of a dime or smaller)
- Craft paint and paintbrushes (optional)
- Strong craft glue or hot glue (with adult supervision)
- Small round magnets or magnetic backing
- Scissors
- Clear drying sealant or Mod Podge (optional, for shine and protection)
How to Make It:
- Step 1: Clean your bottle caps thoroughly and dry them completely. If you want to paint them, this is the time to do it—use bright colors or Dad’s favorite shades. Let the paint dry.
- Step 2: Cut out tiny photos to fit inside the bottle caps. These could be photos of the kids, the whole family, or even the family pet!
- Step 3: Glue each photo inside a bottle cap. Press gently and smooth out any bubbles if using Mod Podge or a sealant.
- Step 4: Once the photos are securely in place and dry, glue a small magnet to the back of each bottle cap. Make sure it’s centered for best sticking power.
- Step 5: Let everything dry completely before wrapping or displaying them.
One last tip:
No photos? No problem! Kids can draw tiny pictures or write messages like “#1 Dad” or “Best Ever” to put inside the caps instead.
Golf Tee Pencil Holder
This fun and sporty pencil holder is the perfect gift for any golf-loving dad! Kids can use golf tees to decorate a simple can, transforming it into a personalized desk organizer. It’s creative, easy, and brings Dad’s favorite hobby to his workspace!
Supplies Needed:
- Clean, empty soup can (label removed)
- Golf tees (about 20–30, depending on the can size)
- Strong craft glue or hot glue (with adult supervision)
- Green felt or artificial grass sheet
- Scissors
- Optional: ribbon, small sign that says “Tee-rific Dad,” or stickers for extra decoration
How to Make It:
- Step 1: Clean the soup can thoroughly and make sure there are no sharp edges. Dry completely.
- Step 2: Cut a strip of green felt or fake grass to wrap around the base of the can. Glue it in place. This becomes the “grass” where the golf tees will be “planted.”
- Step 3: Glue golf tees vertically around the outside of the can. Space them close together or leave a little space between each one—either look is cute!
- Step 4: Let everything dry completely so the tees stay firmly attached.
- Step 5 (Optional): Add a ribbon around the top, a little sign that says “You’re a Tee-rific Dad,” or stickers for extra flair.
One last tip:
If the can is too tall, trim it to a shorter size before starting, or use a smaller can, like one from tomato paste or pineapple tidbits.
Tie-Shaped Card
This fun and easy card lets kids design a tie just for Dad—silly, stylish, or sweet! Shaped like a real tie, it opens up to reveal a heartfelt message inside. It’s the perfect combination of crafty and meaningful, and it’s sure to make Dad smile.
Supplies Needed:
- Cardstock or construction paper (any color)
- Scissors
- Markers, crayons, or colored pencils
- Stickers, glitter, buttons, or other craft decorations (optional)
- Glue or glue stick
- Pencil (for tracing)
How to Make It:
- Step 1: Fold a piece of cardstock in half. On the fold, draw the outline of a large necktie so that when you cut it out, it opens like a card. You can find simple tie templates online or draw freehand.
- Step 2: Cut out the tie shape carefully, keeping the fold intact so it opens like a greeting card.
- Step 3: Let the kids decorate the front of the tie however they like. Go for a classic striped or dotted tie, or get wild with wacky patterns, googly eyes, glitter, or funny drawings.
- Step 4: Inside the card, help younger kids write a sweet message like “You’re the best, Dad!” or “I love you TIE-rifically much!” Older kids can write a personal note or short poem.
- Step 5 (Optional): Add small photos, handprints, or fun stickers inside the card for a little extra love.
One last tip:
This card is super easy to tuck into a gift bag or display on the fridge—and it makes a great classroom or group activity too!
Handprint or Footprint Art
This craft captures the special memories of your child’s size in a fun and creative way. Whether it’s a handprint fish, a footprint rocket, or a “We Love You This Much” arm-span art piece, this project is an adorable and meaningful keepsake for Dad. Kids will love getting their hands or feet painted, and Dad will treasure this artwork for years to come.
Supplies Needed:
- Non-toxic paint (washable)
- Large piece of sturdy paper or canvas (cardstock works well)
- Paintbrushes
- Baby wipes or a wet cloth for cleanup
- Markers or colored pencils (for adding details and messages)
- Optional: Glitter, stickers, or other decorations
- A frame (optional, for displaying)
How to Make It:
- Step 1: Lay out a large piece of paper or canvas on a flat surface, such as a table or easel.
- Step 2: Choose the design. Here are a few fun ideas:
- Handprint Fish: Paint your child’s hand with a fun fish design. Place the handprint sideways so the fingers look like the fish’s tail, and add details like gills and eyes with markers.
- Footprint Rocket: Paint your child’s foot with bright colors and stamp it to make the body of a rocket. Use handprints or cut-out paper shapes to make the rocket’s flames and nose cone.
- “We Love You This Much” Arm-Span Art: Have your child stretch their arms wide and trace both arms and hands to create a big “hug” shape. Add a sweet message like “We love you this much!” inside the hug.
- Step 3: Carefully stamp your child’s painted hand or foot on the paper to create the shape. You may need to help little ones press gently to avoid smudging.
- Step 4: Once the paint has dried, let kids add extra touches with markers, including little details like eyes, stars, hearts, or the message to Dad.
- Step 5 (Optional): Frame the artwork to give it a polished look or add a colorful border to make it stand out.
One last tip:
If your child is too little to do the drawing themselves, you can write a sweet message like “Daddy, you’re our superhero!” or “I love you to the moon and back!” inside the artwork for a personal touch.
Toolbox Craft
This creative and fun toolbox-shaped card is perfect for any dad who loves to fix things around the house! Kids can decorate mini paper tools to add to the card and write a sweet message like “You’re the best fixer-upper, Dad!” It’s a personalized, crafty card that will make Dad smile!
Supplies Needed:
- Construction paper (brown, gray, or any color for the toolbox)
- Scissors
- Glue stick or liquid glue
- Markers, crayons, or colored pencils
- Paper (for cutting out mini tools like hammers, wrenches, screwdrivers, etc.)
- Optional: Stickers or additional embellishments like buttons or small craft tools for extra detail
How to Make It:
- Step 1: Cut a toolbox shape out of the construction paper. You can make a simple rectangular shape with a handle at the top, or get creative and add details like a lock or metal corners.
- Step 2: Using additional construction paper, cut out small shapes of tools like hammers, screwdrivers, wrenches, or pliers. These don’t need to be perfect—simple shapes will work great!
- Step 3: Glue the tools onto the front of the toolbox to make it look like a real tool kit. You can arrange them in any way you like—kids can even create their own tools for added fun!
- Step 4: Write a sweet message inside the card, such as “You’re the best fixer-upper, Dad!” or “Thanks for always fixing things for me, Dad!” Let kids add their own personal touch.
- Step 5 (Optional): If you want to give the toolbox more dimension, glue extra paper tools inside the card, or decorate the toolbox with stickers, glitter, or other craft embellishments.
One last tip:
If you’d like, you can add a “handle” to the card by folding the top part of the toolbox shape to make it easier for kids to hold and give to Dad!
“Nuts About You” Jar
This fun and delicious Father’s Day gift is perfect for a dad who enjoys a good snack. Fill a small jar with mixed nuts or Dad’s favorite snack, and add a personalized label to make it extra special. The clever “I’m nuts about you, Dad!” message is sure to make Dad laugh while he enjoys his treat.
Supplies Needed:
- Small jar with a lid (mason jar, empty peanut butter jar, or any clean container with a secure lid)
- Mixed nuts or Dad’s favorite snack (you can also use candy, trail mix, or any treat he loves)
- Paper or cardstock (for the label)
- Markers, pens, or printed labels
- Glue stick or tape
- Optional: Ribbon, stickers, or other decorations to dress up the jar
How to Make It:
- Step 1: Clean and dry the jar thoroughly, making sure it’s free of any labels or sticky residue.
- Step 2: Fill the jar with mixed nuts or any of Dad’s favorite snacks. You can even personalize it by adding special treats that you know he loves!
- Step 3: Cut a small piece of paper or cardstock to create a label for the lid. Write “I’m nuts about you, Dad!” on the label using markers, pens, or a printed label. You can also add some fun drawings, such as little hearts or nut illustrations, to make it more festive.
- Step 4: Attach the label to the lid of the jar using glue or tape. If you like, you can tie a ribbon around the jar for a little extra decoration.
- Step 5 (Optional): Decorate the jar itself with stickers, glitter, or a personalized message for an added touch of creativity.
What readers say:
If you want to make the jar even more special, include a small note inside the jar, like a mini card that says “Enjoy your snack, and know that I’m always nuts about you, Dad!”
DIY Mug

This craft is a fantastic way for kids to create a one-of-a-kind mug that Dad can use every day! Using oil-based Sharpie markers, they can write a sweet message or draw a fun design on a plain ceramic mug. After baking it in the oven, the design will become permanent, making it a special, usable keepsake for Dad!
Supplies Needed:
- Plain white ceramic mug (available at craft stores or online)
- Oil-based Sharpie markers (they come in a variety of colors)
- Oven (for baking)
- Baking sheet (for the mug)
- Paper towels or cleaning cloth (to wipe off any smudges)
- Optional: Stencils or masking tape for creating designs
How to Make It:
- Step 1: Start with a clean, dry ceramic mug. Make sure to wipe it down with a cloth to remove any dust or fingerprints.
- Step 2: Using oil-based Sharpie markers, let the kids draw, doodle, or write a special message for Dad. They can include something simple like “Best Dad Ever” or get creative with designs like hearts, stars, or even fun illustrations.
- Step 3: If you’re worried about straight lines or neat designs, you can use stencils or masking tape to help create shapes or borders. This is a great way to make the design look polished!
- Step 4: After finishing the design, let the mug dry for about 1 hour to ensure the ink sets.
- Step 5: Preheat the oven to 350°F (175°C). Once the oven is heated, place the mug on a baking sheet. Bake it in the oven for 30 minutes to set the design. Important: Be sure to use adult help when handling the oven!
- Step 6: Once the baking is complete, turn off the oven and allow the mug to cool inside the oven until it reaches room temperature. This helps avoid cracking from a sudden temperature change.
- Step 7: After cooling, the mug is ready to be gifted! The design will be permanent, and it’s safe to wash by hand or in the dishwasher.
What readers say:
If you want to add even more flair, you can tie a ribbon around the handle or place the mug in a gift box for an extra-special presentation.
“Why I Love Dad” Mini Book
This heartfelt Father’s Day gift is simple, meaningful, and completely handmade by the kids. With just a few pages of folded paper, they can create a little book full of drawings and sweet reasons why they love their dad. It’s a keepsake he’ll treasure for years to come!
Supplies Needed:
- Blank white or colored paper (3–5 sheets, depending on how many pages you want)
- Markers, crayons, or colored pencils
- Stapler or hole punch with yarn/string
- Scissors
- Optional: Stickers, washi tape, or other fun decorations
- A ruler (to help with folding, if needed)
How to Make It:
- Step 1: Take a few sheets of paper (half or quarter size is great for small hands) and fold them in half to create a booklet shape. You can use more or fewer pages depending on how many “reasons” the child wants to include.
- Step 2: Stack the folded pages together and staple them along the fold to bind the book. If you don’t want to use a stapler, you can punch two holes near the spine and tie the book together with yarn or string.
- Step 3: On the cover, have the child write the title—something like “Why I Love Dad” or “All About My Dad”—and decorate it with drawings, stickers, or designs.
- Step 4: On each inside page, let the child draw a picture and write one reason they love their dad. For example:
- “You make the best pancakes.”
- “You play soccer with me.”
- “You always make me laugh.”
Encourage them to be specific and heartfelt!
- Step 5: Add any finishing touches like borders, glitter glue, or a special note at the end that says “I love you, Dad!”
One last tip:
If the child is too young to write, have them dictate their sentences while an adult or older sibling helps with the writing. They can still add their own drawings and coloring to make it personal.
Final Thoughts
You don’t need fancy supplies or professional-level skills to make a Father’s Day gift that Dad will remember forever.
These easy crafts are packed with personality, love, and creativity—just the way kids like it.
So gather some glue sticks, markers, and little hands, and get crafting! Dad’s going to love it.